
Server-side transaction tracking
In Google Analytics and Facebook, current Ecommerce transactions rely on client-side events on 'Thank you pages' which results in measurement differences in revenue - and thus broken customer journeys - when:
- Visitors don't return to the Thank you page after the payment:
- When they don't open the Thank you page at all - When they close it because the loading time takes too long
Consequence: revenue is not measured
- Visitors start the purchase process in a browser they chose to use on their device, but are redirected to the device's default browser after the payment
- iPhone visitors start the purchase process in an app (via in-app Safari browser), but are redirected to the default Safari browser after the payment
- iOS 14.5 update: Default and in-app Safari browser are analyzed as two different browsers
Consequence: revenue is attributed to the Thank you page, not to the correct (paid) campaign
The webtracker's Server-side transaction tracking is designed to reduce this measurement error.
All configured server-side events will be connected to a client session and be forwarded to Google Analytics and Facebook. This allows you to accurately
measure Ecommerce transactions. Thus reducing the measurement difference you experience between your backend, and the revenue you measure in
Google Analytics and Facebook.
On this page you will find instructions how to:
Step 1: Forward data to Google Analytics and Facebook
Send data to Google Analytics
If you didn't do this already during the configuration of our First-party data collection service,
you have to add your Google Analytics Property ID. This ID can be found in the admin section of your Google Analytics
and starts with "UA-".
??? info "How to analyse this data in Google Analytics"
Data is stitched with the browser session and forwarded to Google Analytics.
This data can be separately analysed in a segment within Google Analytics using the "data source" field.
Create a segment with "data source"="s2s" to segment all serverside data.
This allows you to analyse all additional data the same way you do any other analysis.

Send data to Facebook
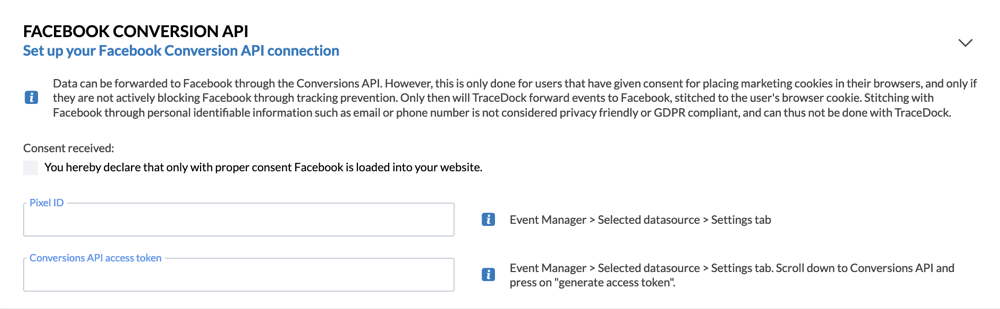
If you also wish to send data to the Facebook Conversions API, you have to:
- Add your Pixel ID
- Add your Conversions API access token
- Declare that Facebook is only loaded into your website with proper consent
Why do I have to declare that Facebook is only loaded in with proper consent?
In opposite to Google Analytics, Facebook does not allow parties to send over anonymous user data. This means that the data the webtracker sends over is always stitched to a user. Thus, according to GDPR, you need prior consent from your user, to send over data to the Facebook Conversions API.
Meaning that without consent of the user, the webtracker will not send over data of that particular user to Facebook.
Note: For Facebook we need to add in the eventID in the pixel event that is fired on the clientside. Open GTM and add eventID: (select variable for the transaction ID)
Step 2: Set up the identify event
The first step in configuring server-side events is to set up a moment in the customer journey where you can identify the user.
The identify event runs in the browser during the checkout stages. This can be done either through a dataLayer event or via javaScript: td.identify().
This event connects the internal customer ID that is added to the server side event with the user's browser data: the (cookie)clientID, IP address and User Agent.
With this connection the data is properly stitched to the correct user session.
The setup of the dataLayer identify event follows a similar flow as for Client side events.
Conceptually, the webtracker listens to the window.dataLayer in a similar fashion as Google's TagManager.
If an object fulfils certain conditions this information is mapped into a format that can be used to identify the user.
You can also perform a javaScript call instead of a dataLayer event. An example of both setups is as follows:
=== "dataLayer"
```javascript

// Add an existing or push a new dataLayer event
// The content of the object contains the internal customerID known in your backend
window.dataLayer.push({userId: "123ABC"})
```
=== "JavaScript"
```javascript

// Fire the identify script using an internal customerID known in your backend
window.td.identify("123ABC")
```
After this step is implemented by your developers, you can configure the event in the the webtracker user portal through the following steps;
-
Copy an example Raw data event from the dataLayer. The dataLayer object is an array, consisting of multiple data layer events.
Select the index which you are interested in using the javaScript codetd.copyDataLayer(<idx>),
and copy the code to the the webtracker portal. -
Determine the conditions. These are the triggers based on the object you just copied. Make sure they are generic and will
fire correctly on each page with this event. -
Determine the identify fields used to extract the user id that will be stitched to the browser data. You can do this visually in the editor.
Use the preview mode to verify if you are happy with your matched data.
To test if your new identify event is coming through: click on the three dots icon ••• to check if that event
becomes visible in the Live events page of the the webtracker user portal.
Add the identify event in all possible checkouts
Often the user checkout funnel involves multiples stages. Our experience shows that if you place the identify event in only one of the checkout steps sometimes leads to a user that is missed. We advise to set up the identify event in each step of the checkout if the internal customer id is known. You do not need to worry about performance, the webtracker will only trigger the event once each session.
Step 3: Connect the server-side event
The second step in configuring server-side events is to set up a web hook in your server each time a transaction has been completed.
The definition of when a transaction is completed depends on your business setup.
Conceptually, on the moment the transaction is completed, your developers fire a HTTP POST request to your personal the webtracker endpoint.
the webtracker ingests this data, stitches it to the browser data, de-duplicates the transactions and forwards it to Google Analytics.
The post request can be set up in each language, for example:
=== "Curl"
```curl

# In the the webtracker user portal you receive your custom endpoint
# The payload you send over to the webtracker can be modified according to your business needs

curl -X POST 'https://xyz.your-company.com/your-endpoint' \
-H  'Content-Type: application/json' \
-d  '{
        "userId": "123ABC",
        "transaction_id": "0001",
        "transaction_revenue": 181.1,
        "products": [
            {
                "id": "12345",
                "name": "TD T-Shirt",
                "price": 181.1,
                "quantity": 1
            }
        ]
    }'
```
=== "Python"
```python
import requests

# In the the webtracker user portal you receive your custom endpoint
url = "https://xyz.your-company.com/your-endpoint"

# The payload you send over to the webtracker can be modified according to your business needs
data = {
        "userId": "123ABC",
        "transaction_id": "0001",
        "transaction_revenue": 181.1,
        "products": [
            {
                "id": "12345",
                "name": "TD T-Shirt",
                "price": 181.1,
                "quantity": 1
            }
        ]
}

headers = {"Content-Type": "application/json"}
requests.post(url, headers=headers, data=data)
```
After this step is implemented by your developers, you can configure the event in the webtracker user portal through the following steps;
-
Copy an example Raw data that your developers post.
-
Determine the conditions. These are the triggers based on the object you just copied. For examplem filter out any incomplete
transactions, or data sent from development servers. -
Determine the outbound data to Google Analytics. Select a predefined (ecommerce) template, and map out all the
fields to the specification set by Google Analytics. You can do this visually in the editor.
Use the preview mode (click on the eye-icon) to verify if you are happy with your matched data. -
Configure the de-duplication service. The webtracker attempts to drop duplicate transactions by filtering out known ids. You can select
the fielduniquein the field mapping to determine on which field to set up the de-duplication service. -
Determine the outbound data to Facebook. Select a predefined template, and map out all the
fields to the specification set by Facebook. You can do this visually in the editor.
Use the preview mode (click on the eye-icon) to verify if you are happy with your matched data.
Good to know: deduplication is not necessary for sending data to Facebook. Facebook already solved this issue.
To test if your new identify event is coming through: click on the three dots icon ••• to check if that event
becomes visible in the Live events page of the webtracker user portal. Within this portal you will see which events have been forwarded to
Google Analytics and with which payload. If events are not forwarded, you can view the message to determine if this is either due to the
de-duplication service, or if the conditions have failed.
Step 4: Shadow testing
Migrating to a complete server-side transaction measurement is a necessary but huge step. We understand this.
Therefore, we provided shadow testing which allows you to test this setup - without a hard switch - in parallel to
your traditional setup.
After your developers implemented both the identify event and the server-side event, we advise to configure your server-side event as a regular non-ecommerce event for at least 2 to 4 weeks. This will allow you to gain confidence in the setup and evaluate the impact in your Google Analytics data.
Analyse your Google Analytics data and make sure that the event value is equal to the revenue you report in your backend, and the marketing attribution (in terms of source and medium) is equal to your ecommerce data.
Once you gain confidence in the setup, you can remove the transaction event on the thank-you page, and select the Ecommerce purchase template in the webtracker portal.
If you have any other doubts about the validity of the outcomes,
don’t hesitate to contact support.
Updated 23 days ago