
First-party data collection
To properly configure the webtracker First-party data collection, you have to configure:
- Step 1: Cookie extension: Extend all first-party cookies for website visitors
- Step 2: Forward client-side events: Configure the events that will be forwarded to Google Analytics for users with (ad blocking) tracking prevention
Step 1: Cookie extention
Extend all first-party cookies by adding them in the platform.
All cookies of website visitors will be extended to the expiration date as set by your cookie policy, or up to 180 days. This means that if a user consents to place cookies, they can return to the website for up to this period (or a maximum of 180 days) for the webtracker to recognize their visit.
In the platform you can select all the cookies you want to extend:
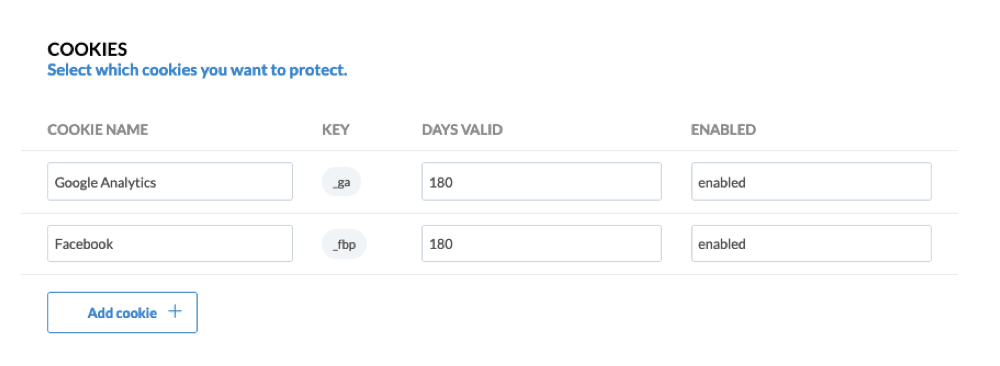
By default, the cookie _ga has been added to the implementation. This cookie contains the persistent clientID on
which Google Analytics runs.
By default, the cookies that are required for the webtracker to run properly have been extended too.
You can add any cookie, as long as the value in the cookie is designed to contain a persistent id.
What are cookies with Persistent IDs?
It is only useful to extend cookies containing Persistent IDs. These are cookies that have a client or user identifier that is used to track a user. It realizes this by sending over the value of this cookie with each pageview of event. With this technique the server knows which pageviews and events came from the same client and can attribute the events properly.
How to identify which cookies to extend
Determining which cookies to extend and protect against the consequences of ITP is important in deciding which cookies to add to the webtracker configuration.
Checking which cookies to protect can be done in the Storage Tab of the Developer tools.
-
Open up Safari developer tools as per this instruction.
-
Navigate to the Storage tab (top menu) and open the Cookies tab (left menu).
-
Within the Cookies overview of your domain you will find all cookies, theExpires column shows which date these cookies expire.
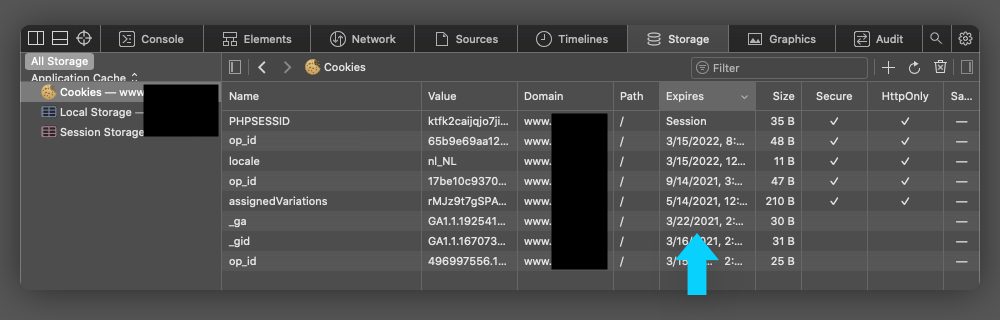
You will notice that the Expires date is set either 24 hours or 7 days depending on if the session is deemed commercial".
Which cookies you should not extend
Note that not all cookies should be extended. There are two examples:
- Cookies that are designed to only last 24 hours. For example the Google's _gid cookie contains data around page speed calculations. In order for Google to properly manage this service, you should not extend the lifetime of this cookie.
- Some cookies contain state information. Such as Criteo's cto_bundle is designed to contain session-specific state information. Extending this cookie will lead to reduced attribution by Criteo.
Step 2: Forward client-side events
Adding client side events can be done in the platform.
Adding Ecommerce events
The webtracker works with the standard ecommerce events as defined by Google.
To add a new event, click on the button “new event” and choose one of the pre-composed templates.
We advise to add the Impressions, Detail and Purchase.
Adding a custom dataLayer event
You can also configure your own custom dataLayer event. Add a "new event" and choose Other dataLayer.
Conceptually, the webtracker listens to the window.dataLayer in a similar fashion as Google's TagManager. If an object fulfils certain conditions this information is mapped into a format that Google Analytics understands and forwarded if the user has employed tracking prevention.
The following steps can be done to implement client-side events:
-
Copy an example Raw data event from the dataLayer. The dataLayer object is an array, consisting of multiple data layer events. Select the index which you are interested in using the javaScript code
td.copyDataLayer(<idx>),
and copy the code to the webtracker portal. -
Determine the conditions. These are the triggers based on the object you just copied. Make sure they are generic and will fire correctly on each page with this event.
-
Determine the outbound data to the Customer Data Platform. Select a predefined (ecommerce) template, and map out all the fields to the specification you want. You can do this visually in the editor. Use the preview mode to verify if you are happy with your matched data.
To test if your new event is coming through: click on the three dots icon ••• to check if that event becomes visible in the Live events page of the the webtracker user portal.
Publishing changes
After you save a client-side event, you will notice that you can publish your changes. The webtracker user portal keeps track of all updates that you perform. Only after you publish, the changes will be built into a new plugin for your website.

Updated almost 2 years ago