
Cloudflare support (optional)
Info only applicable if you have Cloudflare enabled
If you have Cloudflare enabled, you also need to adjust the Proxy Status of the endpoint in your Cloudflare dashboard, so their caching is disabled. On this page, you will read which settings you have to apply in Cloudflare.
To host the the webtracker code on your website, an A record has to be added to the DNS (Domain Name Systems) settings of your domain. However, if you have Cloudflare enabled, you also need to adjust the Proxy Status of the endpoint in your Cloudflare dashboard so their caching is disabled.
Adjusting your Cloudflare DNS settings to enable the webtracker can be done in the following 3 steps:
Step 1: Open your Cloudflare DNS Management

The first step is to open your Cloudflare account and Navigate to the DNS Management tab in the Cloudflare account of your website. This is where you manage which of your subdomain's will be proxied by the webtracker.
Step 2: Locate the webtracker A record
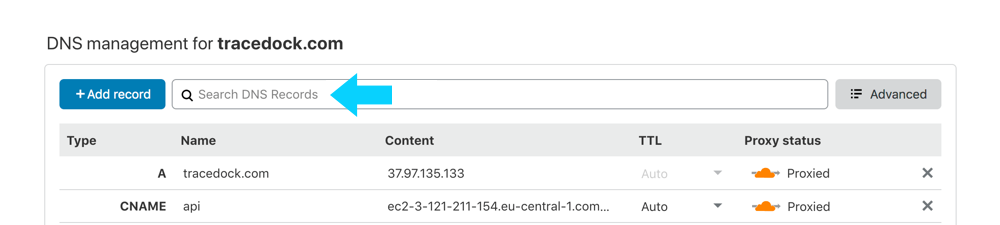
In the table, locate the A record which has been assigned by the webtracker. Either search for it in the table, or use the search bar to enter the assigned subdomain.
Step 3: Disable the Proxy status to "DNS only"

Within the DNS management of Cloudflare, you will see that by default the proxy settings of the A record is orange. For the webtracker we require this to be turned off, and that can be done by toggling the proxy button to grey "DNS only".
Note that Cloudflare will still service your webtrackerA record, but no other Cloudflare features such as SSL or caching will be applied. For more information about the Cloudflare proxy status, visit their support pages on Managing DNS records in Cloudflare.
Updated about 2 years ago