
Diagrams
Create an Apple Pay transaction
The CM.com Online Payments API enables you to create an Apple Pay transaction. The diagram below presents the interaction that takes place between Consumer/Apple Device, Merchant (You), CM.com Online Payments API, and Apple when creating an Apple Pay transaction:
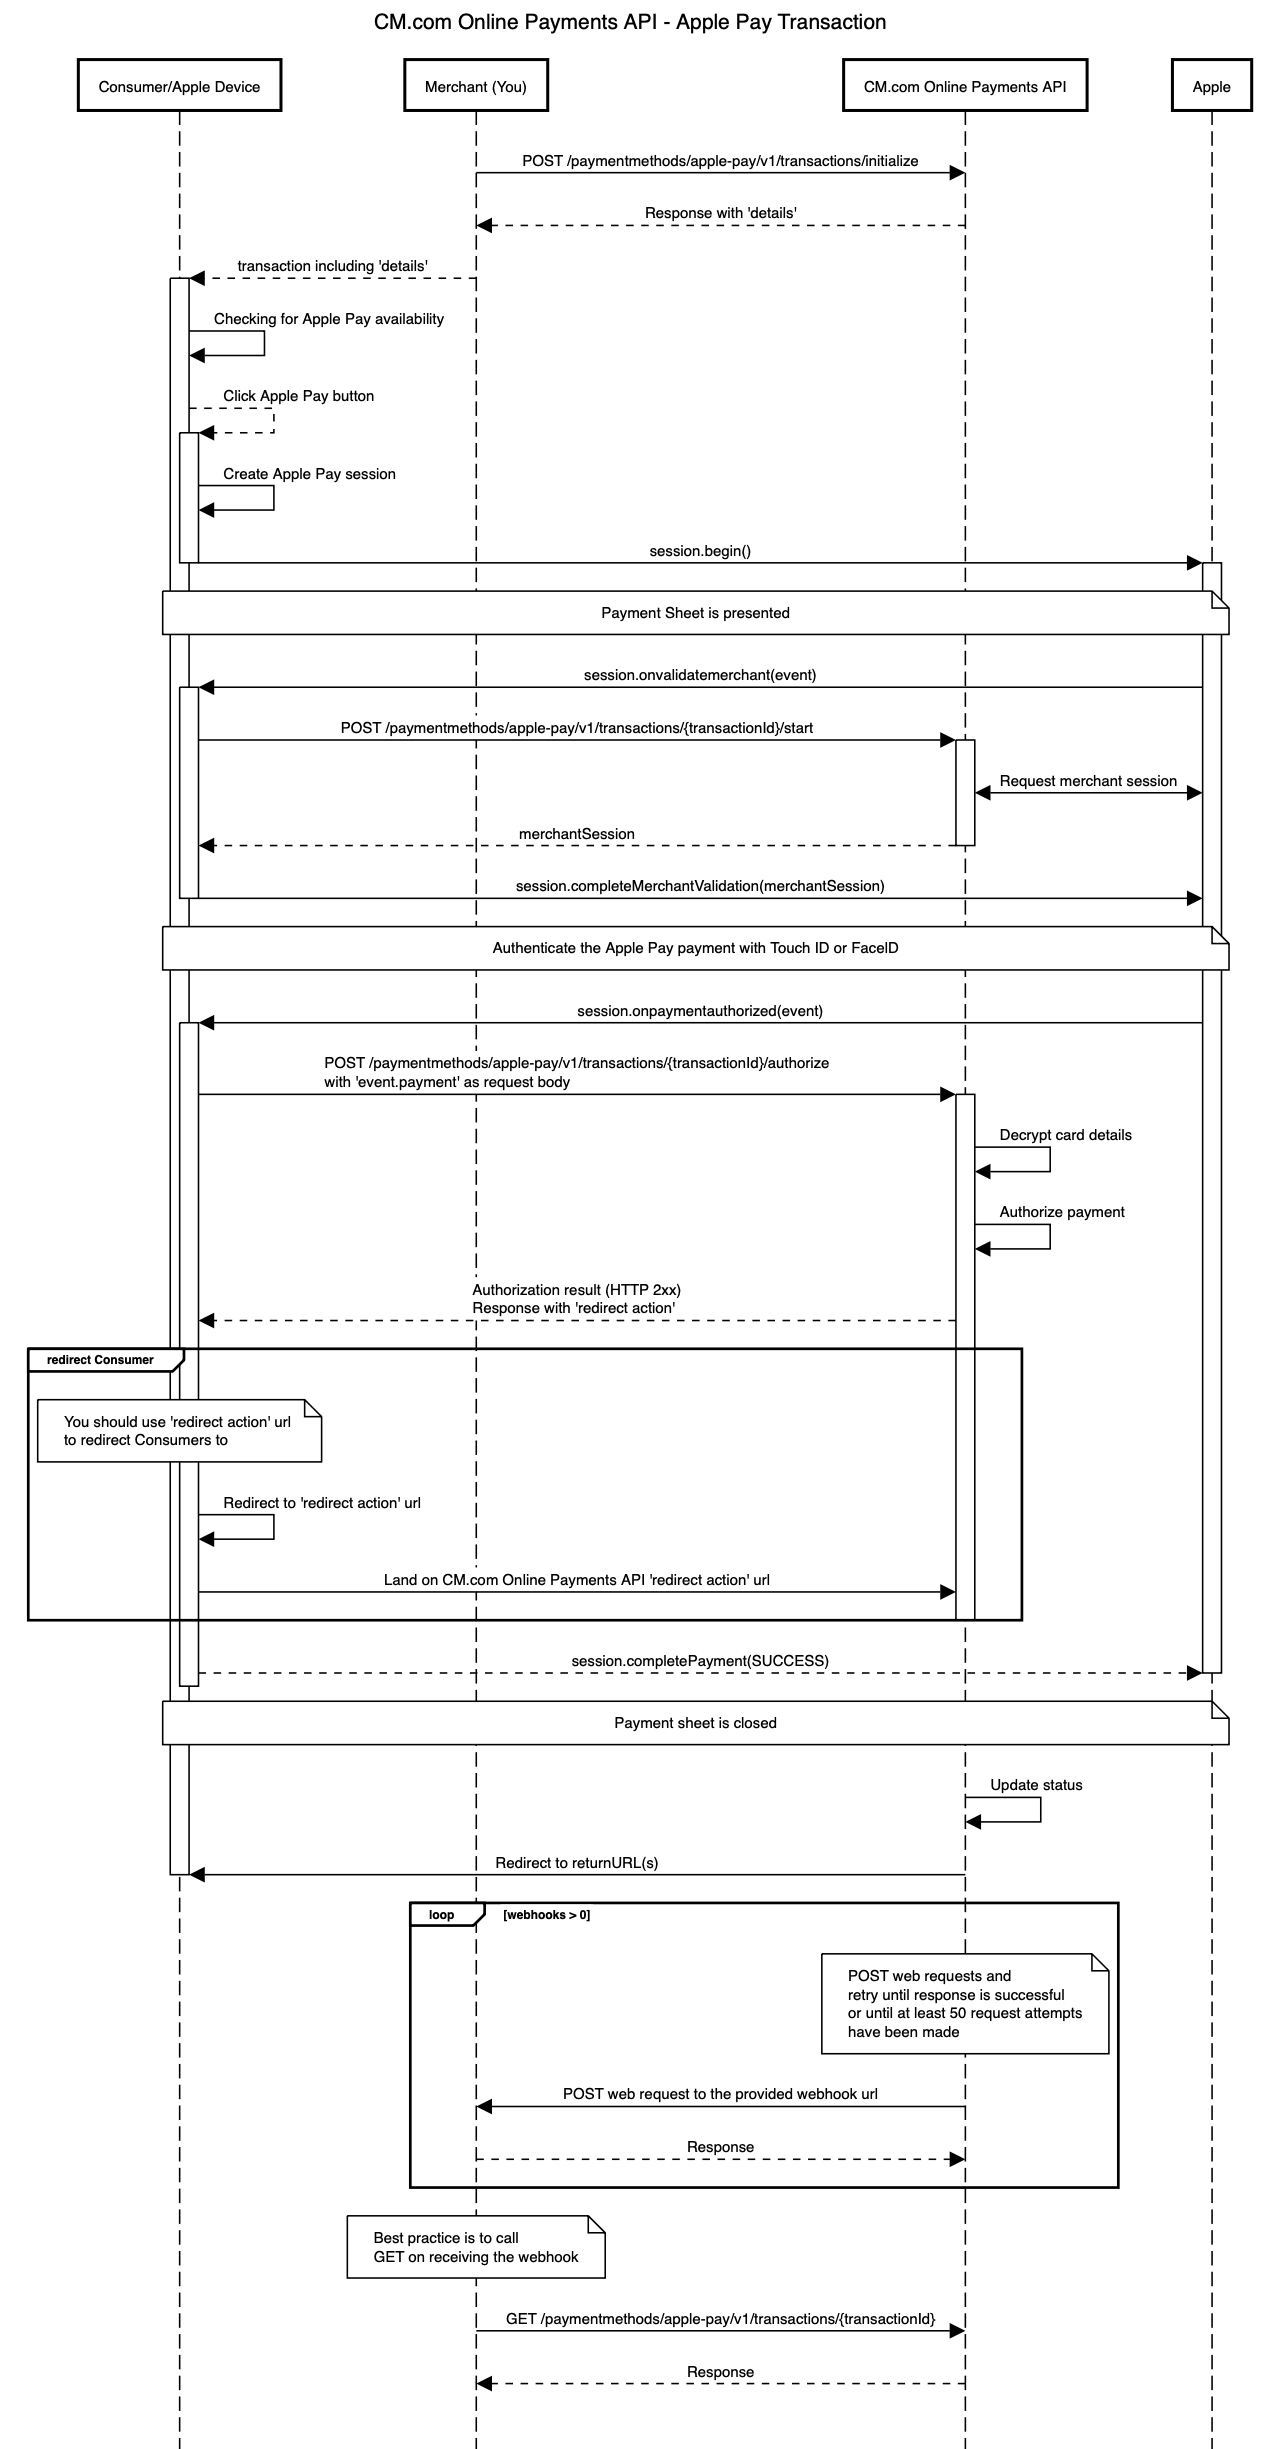
In the diagram above the following steps are performed:
-
A Merchant wants to enable Apple Pay payments for a Consumer/Apple Device. In order to do this, a Merchant makes a request to initialize Apple Pay transaction.
-
Merchant receives a successful transaction response including
details. These details are passed to Consumer/Apple Device because they are necessary to render the Apple Pay button on the Apple Device. -
Checking for Apple Pay availability; before showing the Apple Pay button to the Consumer/Apple Device the availability of Apple Pay needs to be checked. For more details see: Checking for Apple Pay Availability. Example javascript:
function canMakePaymentsWithApplePay() { if (window.ApplePaySession) { try { if (ApplePaySession.canMakePayments()) { return true; } else { console.log("Can not make Apple Pay payments."); } } catch (e) { console.log("Starting an Apple Pay session requires an secure document.", e); } } else { console.log("Apple Pay JS API is not available."); } return false; } -
Creating an Apple Pay session; after the Consumer clicks on the Apple Pay button a session has to be created specifying the payment details. The following payments details need to be provided in the request (For more details see: Creating an Apple Pay Session):
Field Description Required countryCode The country of the merchant. ✅ currencyCode The currency for the payment. ✅ supportedNetworks The payment networks supported by the merchant. The supported values are 'visa', 'masterCard', 'maestro'. (Depending on the payment methods enabled on your account.) ✅ merchantCapabilities The payment capabilities supported by the merchant. The only supported value is 'supports3DS'. ✅ total.label The name of the shop that is shown to the consumer. ✅ total.amount The payment amount in major unit, i.e. including a decimal point. ✅ Example javascript:
let request = { countryCode: transactionJson.details.merchantCountry, currencyCode: transactionJson.currency, supportedNetworks: transactionJson.details.allowedCardNetworks, merchantCapabilities: ['supports3DS'], total: { label: transactionJson.details?.merchantName || 'Undefined merchant display name', amount: (transactionJson.amount / 100).toString() } }; var session = new ApplePaySession(4, request); -
After the session is created, call its begin-method to show the payment sheet. Example javascript:
session.begin() -
Validating the merchant; Apple initiates the validation of the merchant when the payment sheet is shown using the On Validate Merchant event. So,
session.onvalidatemerchant(event)event handler is called when the payment sheet is displayed. The event parameter contains the validation URL attribute (event.validationURL), which should be used in the call to start Apple Pay transaction. The response is an opaque merchant session object, so If successful the returned merchant session must be used to complete the merchant validation. Otherwise, the session must be aborted. Example javascript:session.onvalidatemerchant = event => { console.log(event); let controller = new AbortController(); const signal = controller.signal; const reqOptions = { method: "POST", headers: { 'Content-Type': "application/json", Authorization: `Bearer ${document.getElementById('token').value}`, Accept: `application/json` }, mode: "cors", body: JSON.stringify({ validationUrl: event.validationURL, displayName: transactionJson.details.merchantName, domainName: window.location.hostname }), signal: signal }; // Call your own server to request a new merchant session. fetch(baseUrl + "/start", reqOptions) .then(response => { if (!response.ok) { console.error(response); displayMessage(response.statusText); session.abort(); controller.abort(); } return response.json(); }) .then(merchantSession => { console.log(`Merchant session:`, merchantSession); session.completeMerchantValidation(merchantSession); }) .catch(err => { console.error("Error fetching merchant session", err); controller.abort(); }); }; -
Authorizing the payment; Apple initiates the authorization of the payment when the consumer authenticates the payment using the On Payment Authorized event. So,
session.onpaymentauthorized(event)event handler is called when the user has authorized the Apple Pay payment with Touch ID, Face ID, or passcode. The event parameter contains the payment attribute (event.payment) containing the encrypted card details. The payment attribute must be sent as-is in the call to authorize Apple Pay transaction. Example javascript:session.onpaymentauthorized = function(event) { console.log(JSON.stringify(event)); let controller = new AbortController(); const signal = controller.signal; const reqOptions = { method: "POST", headers: { 'Content-Type': "application/json", Authorization: `Bearer ${document.getElementById('token').value}`, Accept: `application/json` }, mode: "cors", body: JSON.stringify(event.payment), signal: signal }; fetch(baseUrl + "/authorize", reqOptions) .then(response => { if (!response.ok) { console.error(response); displayMessage(response.statusText); session.completePayment({status: ApplePaySession.STATUS_FAILURE}); controller.abort(); } else { session.completePayment({status: ApplePaySession.STATUS_SUCCESS}); } return response.json(); }) .then(result => { console.log('Authorization response:', result); let responseElement = document.getElementById('response'); let btnRedirect = document.getElementById('btnRedirect'); responseElement.innerHTML = `<pre>${JSON.stringify(result, null, 2)}</pre>`; responseElement.classList.remove('d-none'); btnRedirect.classList.remove('d-none'); document.getElementById('btnRedirect').addEventListener("click", function () { window.location.href = result.action.redirect?.url; }); document.querySelector('#apple-pay-btn').remove(); }) .catch(err => { console.error("Error authorizing payment", err); displayMessage(err); controller.abort(); }); };- While authorizing an Apple Pay transaction, the CM.com Online Payments API decrypts the provided card details and authorizes the payment. After the Payment is authorized the result must be used to complete the payment on the session (e.g.
session.completePayment({status: ApplePaySession.STATUS_SUCCESS});). This will show the result of the authorization on the payment sheet, and close the payment sheet within 2 minutes automatically. - If successful the authorize Apple Pay transaction response also contains an
action.redirect.urlwhere Consumers should be redirected to. This will make them land on the CM.com Online Payments API 'redirect action' url. - When the Consumer dismisses the payment sheet instead of authenticating the payment, the On Cancel event is called by Apple. Example javascript:
    session.oncancel = function() {
        window.pollOrderStatus();
    };
- While authorizing an Apple Pay transaction, the CM.com Online Payments API decrypts the provided card details and authorizes the payment. After the Payment is authorized the result must be used to complete the payment on the session (e.g.
-
Eventually the status of the CM.com Online Payments API transaction will be updated and that will redirect Consumers again from the 'redirect action' url to the returnUrl(s) specified by the Merchant when transaction was initialize.
-
If the Merchant also specified webhooks in the original request then CM.com Online Payments API will trigger the proper webhooks and make the requests to the webhook URLs specified by the Merchant. When using webhooks, be aware that they are only a "best effort" mechanism.
-
Merchant gets the latest details of the transaction. This usually happens once the Merchant received a webhook request.
The API endpoints involved on this flow are:
Create a refund for the payment made with an Apple Pay transaction
The CM.com Online Payments API enables you to create a refund for the payment made with an Apple Pay transaction. The diagram below presents the interaction that takes place between Merchant (You) and CM.com Online Payments API when requesting a refund for the payment made with an Apple Pay transaction.
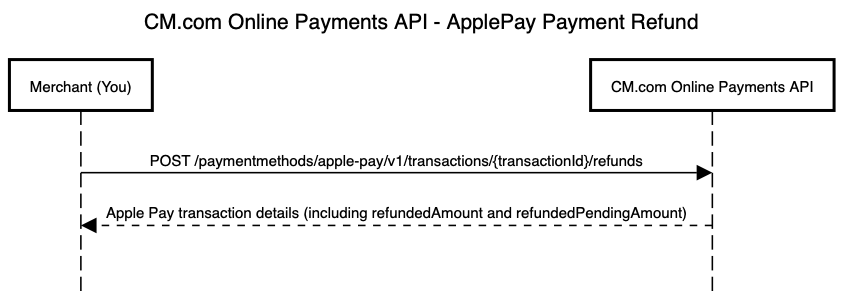
The API endpoints involved on this flow are:
Updated almost 2 years ago